Have you ever wanted to give your photos an artistic, vintage look?
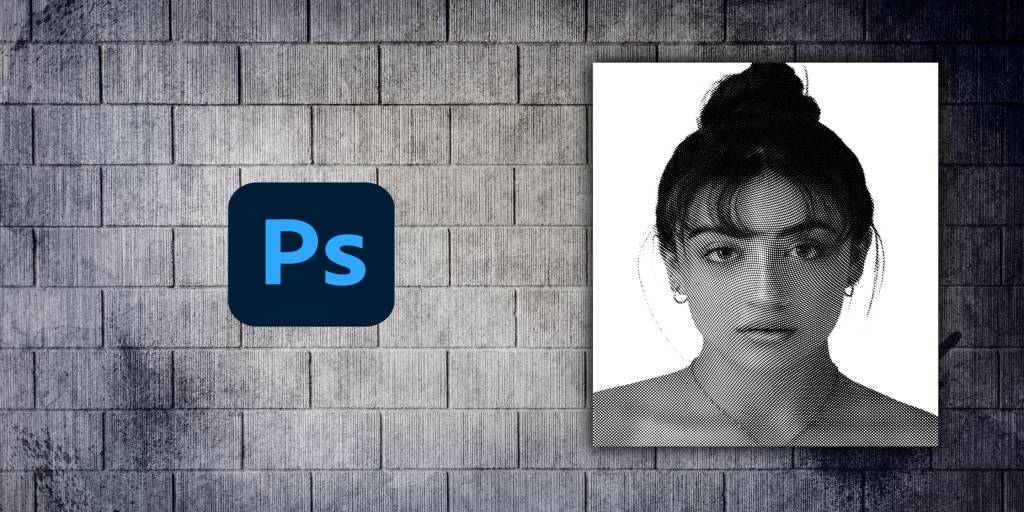
Well, I’m going to show you how to easily create a dotted halftone pattern effect in Photoshop.
This will make your images look like they came straight from an artsy, avant-garde gallery!
The dotted halftone technique has been used for ages to reproduce images in printing. It uses small dots in a grid pattern to create gradients and the illusion of continuous tones.
By applying this retro effect, you can transform any photo into an edgy, artsy design.
Dotted Halftone Pattern Effect in Photoshop
In this beginner Photoshop tutorial, I’ll walk you through step-by-step how to add a halftone pattern to your photos.
No complex tools or design skills are needed!
Just follow along with these simple instructions to give your images a cool, old-school style.
Step 1: Open Your Image in Photoshop
First, open up the photo or design you want to modify in Photoshop. This can be any image that you want to give a retro, halftone look.
Step 2: Convert to Black and White
Since halftone graphics use only black and white, we need to remove the color from your image. To do this, go to Layer > New Adjustment Layer > Black & White. This will automatically convert your photo to black and white.
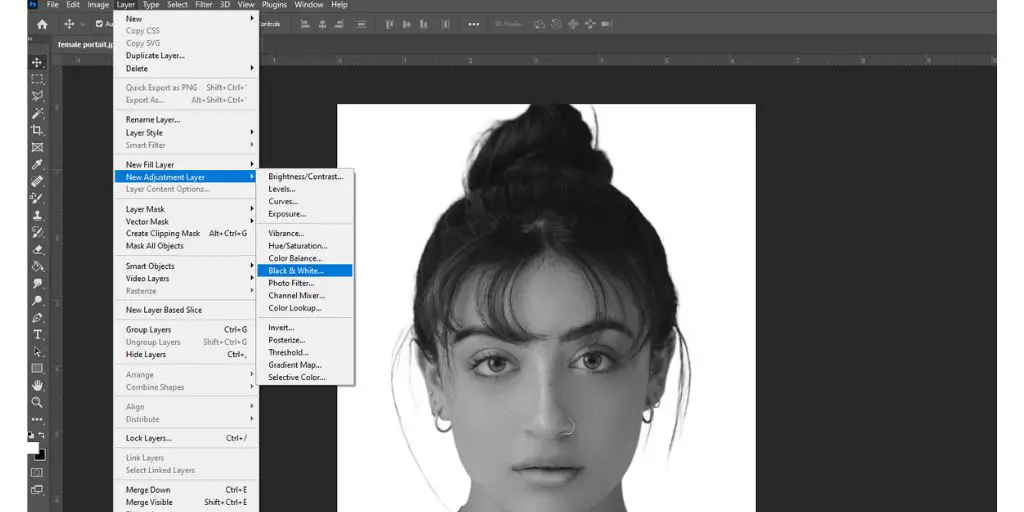
Step 3: Add a 50% Gray Layer
Next, we need a layer to apply the halftone pattern. Click on the New Layer icon to add a blank layer above your image.
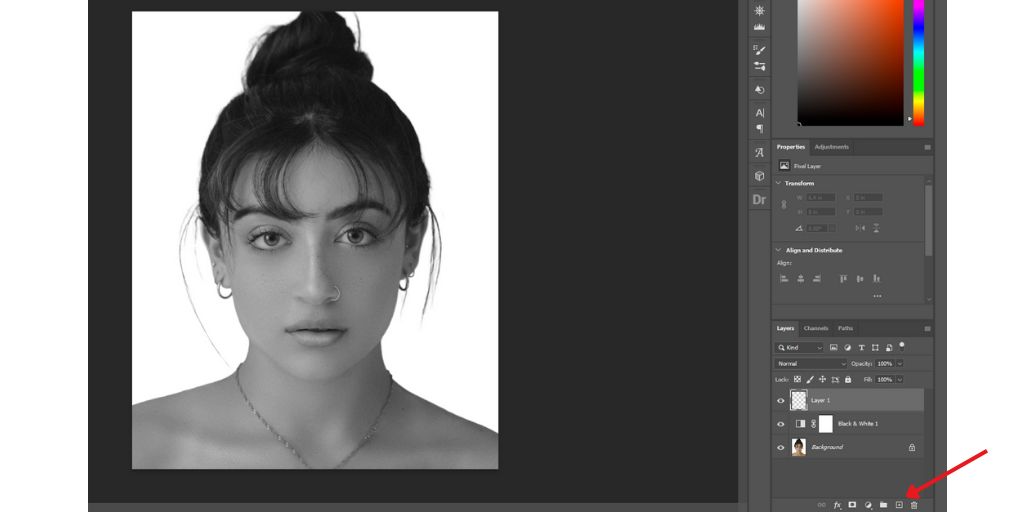
Then go to Edit > Fill and set Contents to 50% Gray. This fills the new layer with a solid, medium gray.
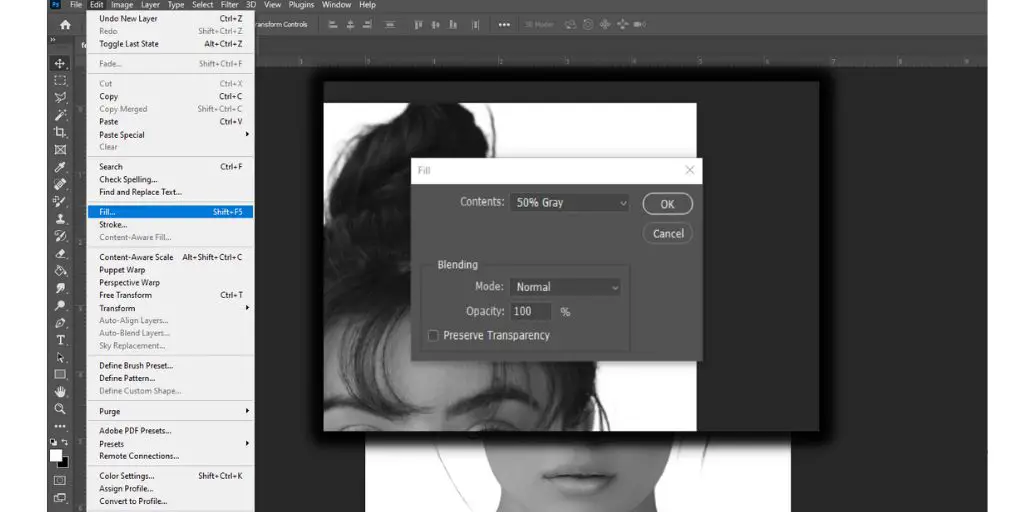
Step 4: Convert the Gray Layer to a Smart Object
To keep your editing flexible, we’ll convert this gray layer to a Smart Object. Right-click the layer and select Convert to Smart Object. This allows you to go back and tweak adjustments later.
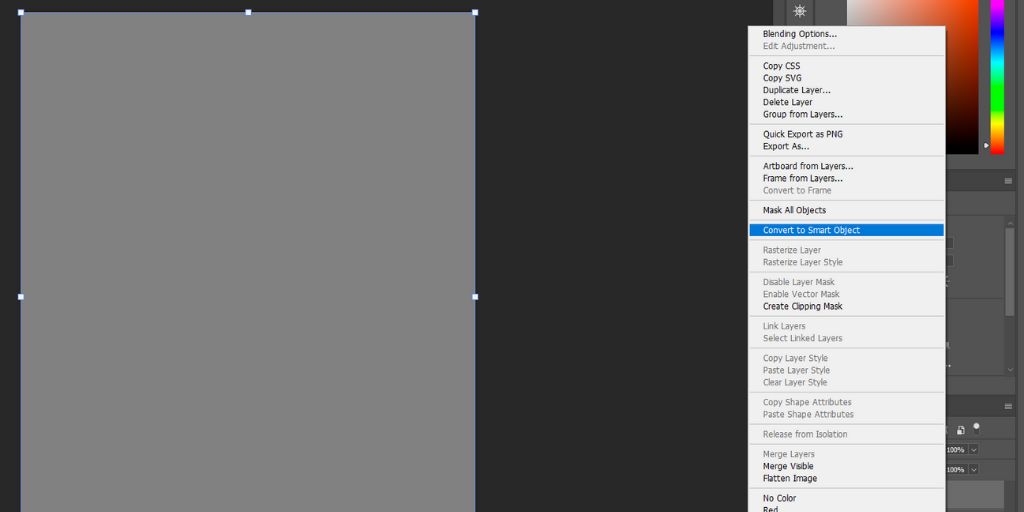
Step 5: Apply the Halftone Filter
Now for the fun part! Go to Filter > Filter Gallery > Sketch > Halftone Pattern. Here you can customize the dot pattern.
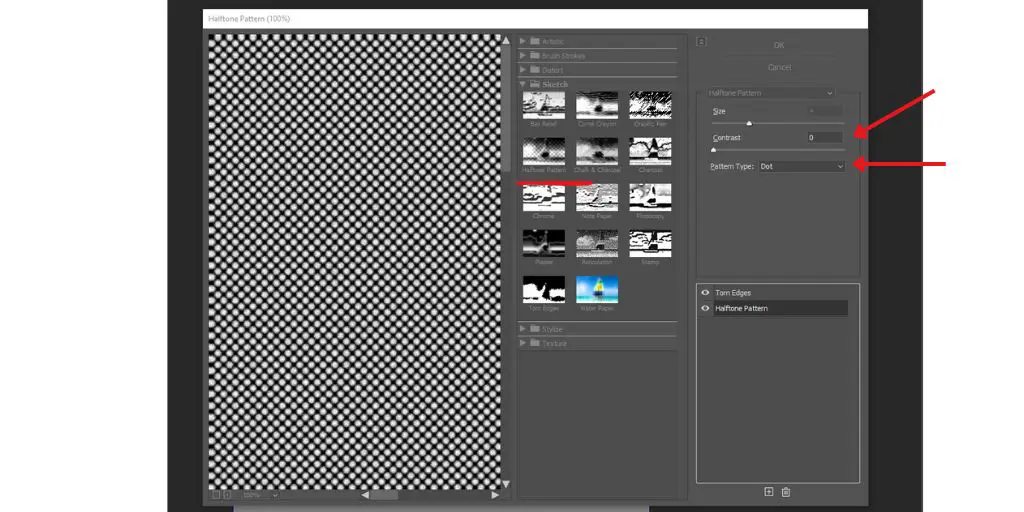
Adjust the Size, Contrast, and Pattern Type to your liking. Start with 4-6 pixel dots and 0% contrast.
Step 6: Add a Grungy Texture
To give a rough, grungy texture, click New Layer again and go to Edit > Fill > Torn Edges. Set Smoothness around 13-14 and Contrast to 0-1. This adds an edgy, worn look.
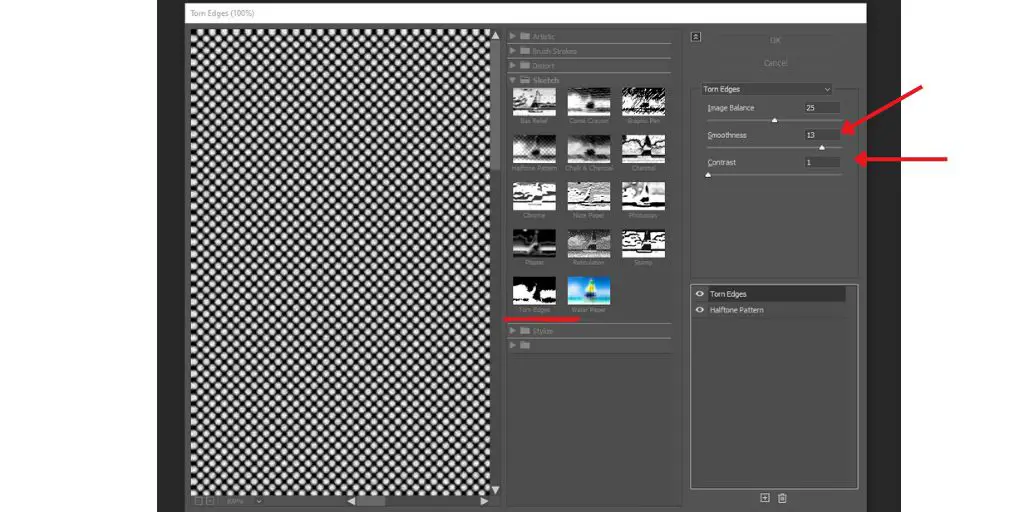
Step 7: Set Blending Mode to Hard Mix
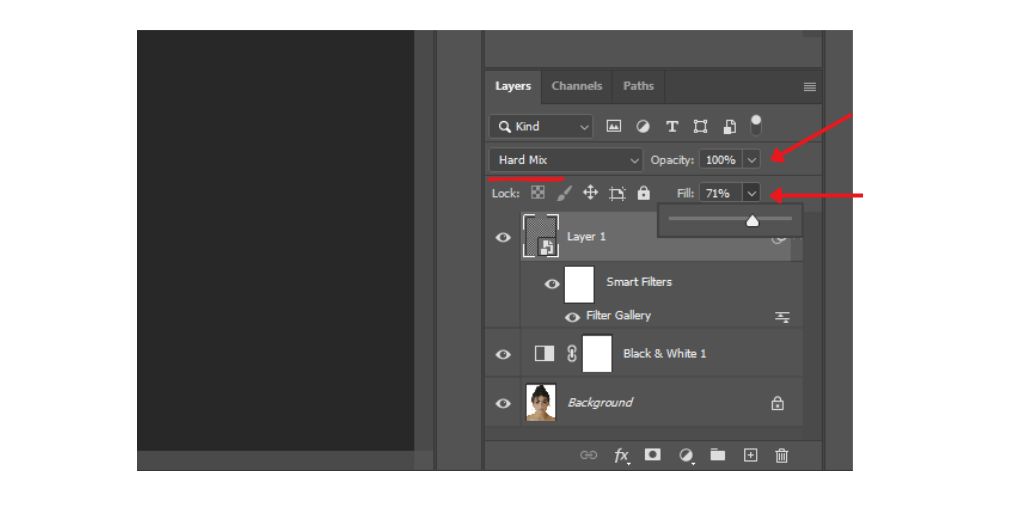
Change the Blending Mode of the halftone layer to Hard Mix so the pattern shows through. Lower the Opacity and Fill to let more texture show.
Step 8: Add a Swirl Distortion
Lastly, apply a swirl effect to twist the dots. On the halftone layer, go to Filter > Distort > Twirl.
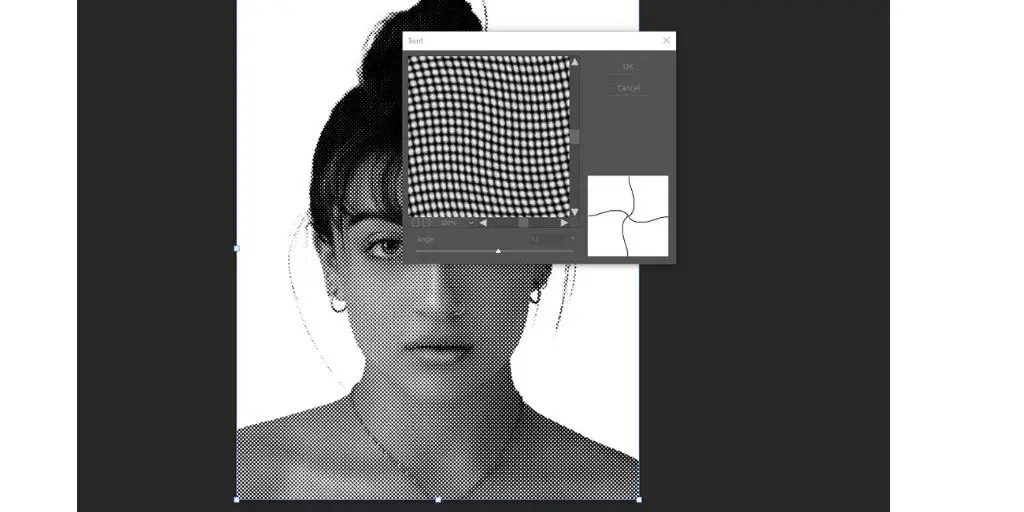
Adjust the Angle and Radius to swirl and bend the pattern.
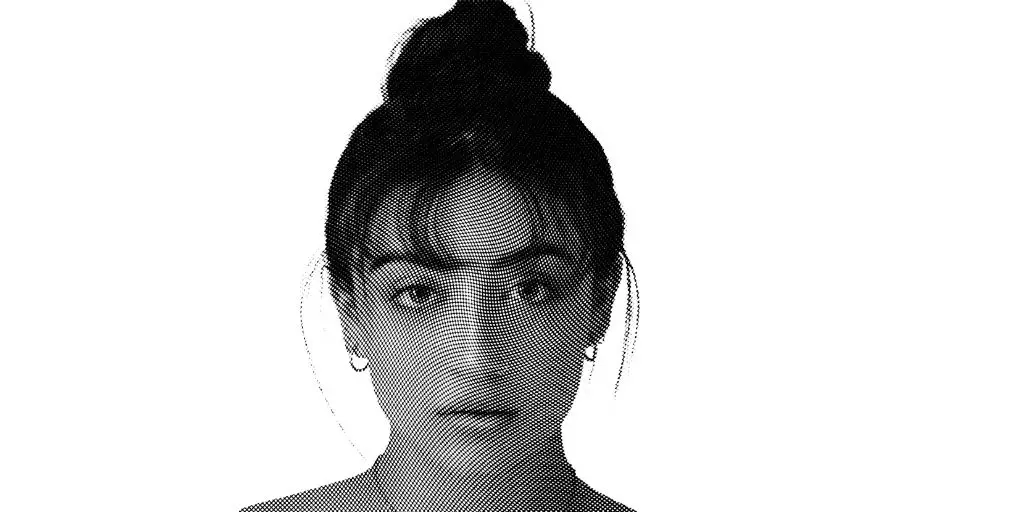
And that’s it!
With just a few easy steps, you can transform any image into retro-looking halftone art.
Experiment with the settings to create different styles. Add more filters for a grungier effect.
Have fun and get creative!
FAQ
What images work best for the halftone effect?
The halftone look works great on any high-contrast black-and-white photos, illustrations, or designs. Images with strong lines and shapes will translate best into the dotted pattern. Avoid low-contrast photos with gradual tones.
How can I customize the dot pattern?
In the Halftone Filter settings, you can change the dot Size, Contrast, and Pattern. Bigger dots with higher contrast will be bolder. Try dots, circles, lines, or zigzags for different styles.
The effect looks too rough. How can I soften it?
If the torn edges texture is too strong, reduce the Smoothness or lower the Opacity of that layer. You can also apply a slight Gaussian Blur to the halftone layer to soften the dots.
Can I apply this effect to only part of the image?
Yes! Add a layer mask to the adjustment and texture layers. Then paint black on the mask where you don’t want the effect showing. This allows you to selectively apply the halftone style.
How do I save my completed halftone design?
When you’re done, simply save or export your image as a JPG, PNG, or PDF. For print use, a high-resolution 300 PPI image is recommended. Share your unique art!
I hope you found this halftone effect tutorial helpful! Let me know if you have any other questions. Now get creative with giving your images an artsy, retro vibe in Photoshop.
BONUS FOR YOU: Get the Digital Product Starter Kit and start building your own online business today.
Here Are Some of My Favorite Tools For Print-on-demand
As a graphic designer and POD seller, I’ve had the opportunity to discover different helpful products and tools that can be time-saving and make the process of creating your designs a bit smoother.
DESIGNS: Kittl (best for t-shirt designs), Vexels (for professional designs), Placeit (for unique product mockups)
GRAPHICS: Creative Fabrica (cheapest marketplace), Envato Elements (more variety)
SELLING DESIGNS: Creative Fabrica (for advanced graphic designers)
ETSY:
- Research – Alura (best), ProfitTree ( beginners)
- Fulfillment – Printul (beginners), or Printify (advanced).
Disclosure: Some of the links above may contain affiliate partnerships, meaning, at no additional cost to you, NechEmpire may earn a commission if you click through to make a purchase.
- How to Highlight an Image with a Glowing Neon Frame in Canva - December 13, 2025
- How to Curve & Wrap Text Around a Circle in Canva (Step-by-Step Tutorial) - December 13, 2025
- How To Remove Background In Canva Mobile App - September 4, 2025

